Showing posts with label recipes. Show all posts

Wednesday, October 30, 2019

Creamy Polenta with Wild Mushrooms

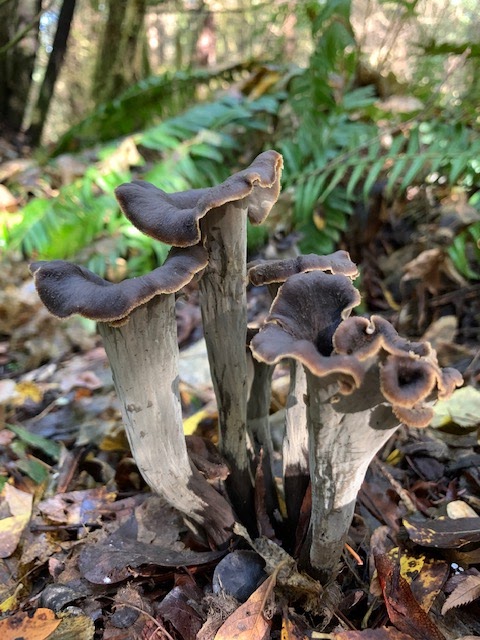
THE BLACK TRUMPET (Craterellus sp.) is one my favorite wild mushrooms for the table. Like its cousins in the chanterelle family, it's earthy with a touch of fruity sweetness. On the West Coast, most pickers look for them in the coastal hills of northern California and southern Oregon, where they hide among the leaf litter of forests dominated by Douglas fir, tanoak, and madrone (with a smattering of decayed redwood for good measure). But they can be found elsewhere...

One of the great pleasures of mushroom hunting is sleuthing out the many clues that lead to a full basket. The black trumpet is one of those varieties that requires putting on your detective cap and paying serious attention to the landscape. Cracking the case results in a righteous dinner.

Creamy Polenta with Wild Mushrooms

This recipe is adapted from a New York Times recipe by Sam Sifton, who rightly points out that soy sauce and butter make a heavenly combination, particularly in service to fungi, because of the massive umami factor. 

Many home cooks view polenta with trepidation. It doesn't follow directions! Don't be afraid. Polenta is easy and forgiving, even if temperamental—and a perfect vehicle for wild mushrooms. Yes, it rarely cooks the same way twice, varying by brand, weather, elevation, and seemingly by whim. Just add more liquid if necessary and adjust seasoning, cheese, and butter to taste.

This makes a side dish for two. I used a mixture of golden chanterelles and black trumpets.

For polenta:

1 cup water (plus more as it cooks)
1/2 cup milk
1/2 cup polenta
1/2 tsp salt
1 tbsp butter
Parmesan cheese, grated (optional)

For mushrooms:

1/4 lb (or more) wild mushrooms, roughly cut into pieces
2 tbsp butter, divided
2 cloves garlic, minced
2 tbsp porcini powder*, rehydrated with 1/2 cup hot water
1 tbsp soy sauce
1 tbsp heavy cream
1 tsp olive oil
Salt and pepper

* You can pulverize a store-bought package of dried porcini into powder with a spice grinder. I make jars of the stuff from my #3 mature king boletes to use with rubs and in sauces, stews, and soups. No porcini? Substitute with chicken or vegetable stock.

1. Over medium-high heat, bring water and milk to simmer in a medium-sized sauce pan or pot. Slowly add polenta while whisking to prevent clumping. Season with salt and continue to whisk for a minute or two. Turn heat to low and cook for about 45 minutes, stirring occasionally. Add more water as necessary to maintain creaminess.

2. Meanwhile, in a small pan sauté garlic and mushrooms in a tablespoon of butter over medium heat, stirring occasionally. Cook mushrooms until they release their water and then cook off liquid, allowing mushrooms to brown slightly; this might take several minutes. Season with salt and pepper.

3. Add 1/2 cup porcini stock to mushrooms. Reduce by half and turn heat to low. Add a splash each of soy sauce and cream and a drizzle of olive oil. Stir together and allow to thicken. Keep warm in pan over low heat while waiting for polenta to cook. If sauce becomes too thick, add another splash of water, cream, or stock. Just before plating, melt one more tablespoon of butter into mushroom sauce and stir.

4. When polenta is thoroughly cooked and creamy, add butter and cheese (and more liquid if necessary). Adjust seasoning. Serve in a bowl and spoon mushrooms and sauce on top.

Serves 2 as a side dish.

Tuesday, April 23, 2019

Stir-fried Oyster Mushrooms with Chicken

West Coast woods from NorCal to BC are loaded with oyster mushrooms right now—and it's nice to see the excitement they're stirring in foraging communities. Lately I've been seeing photos of oysters all over online message boards and myco groups. Morels have traditionally commanded most of the vernal ink among mycophagists, but for a majority of us west of the Cascades the oyster is really the local fungus of springtime.

I start looking for oysters (Pleurotus sp.) in lowland forests as soon as the temperature begins to warm and a few days after the first good rains. Some years I find them as early as late February though April is more typical. They'll keep fruiting throughout the spring and sometimes well into summer if regular rain continues, and then again in the fall.

The saprophytic oyster mushrooms in the Northwest will usually be found in association with dead red alder or cottonwood. They look like clam shells growing off the sides of standing snags or fallen trees. Fresh specimens are creamy white, with hues of pink or tan. They have gills and stems that are off-center.

While you can buy farmed oysters at the market, I find the wild variety to be more flavorful, and I use them in all kinds of dishes from around the world, east and west. My go-to recipe of recent years has been a quick, delicate Chinese stir-fry that will appeal to those who prefer a less spicy Cantonese style, which allows the oysters to really shine. If you're vegetarian, skip the chicken or swap in tofu.

3 tbsp peanut oil
3/4 lb oyster mushrooms, cut into half-dollar pieces
3/4 lb chicken breast, thinly sliced into a similar size as mushrooms
4 green onions, cut into 2-inch pieces
3 large cloves garlic, thinly sliced
1 large thumb-sized piece of ginger, thinly sliced
salt and white pepper, to taste

Marinade
1/2 tsp salt
1 tsp Shaoxing wine
1 tsp potato starch

Sauce
3 tbsp chicken stock
1 tbsp oyster sauce
1/2 tsp potato starch

1. Combine sliced chicken in a bowl with marinade ingredients, stir, and set aside. Whisk together sauce ingredients in a small bowl and set aside.

2. In a wok over medium heat, sauté oyster mushrooms in 1 tbsp oil, stirring occasionally. Remove to a bowl when slightly browned.

3. Heat 2 tbsp oil in wok over high heat and add marinated chicken. When the chicken is partly cooked but still pinkish, add garlic, ginger, and green onion. Cook together, stirring, for 30 seconds until aromatic before returning oyster mushrooms to wok. Continue to cook together another minute or so until chicken is barely cooked through.

4. Pour in sauce, stir to coat, and reduce heat. Season to taste and serve immediately with rice.

Serves 2


Monday, February 4, 2019

Huckleberry Snow Cone

What do you do when it snows in Seattle? Make a Huckleberry Snow Cone!

While I was out skiing around the neighborhood this morning, my daughter Ruby was busy cooking down a cup of frozen huckleberries with water and sugar, then blending it in the Vitamix. After a quick straining she had a deep red, sweet and syrupy liquid to pour over packed snowballs—a perfect treat for a no-school Snow Day.

Monday, October 29, 2018

Matsutake Dobin Mushi

Last year my friend Taichi Kitamura, chef/owner of Sushi Kappo Tamura in Seattle, gave me a set of two dobin mushi teapots he'd recently picked up in Japan, where "dobin" means teapot and "mushi" is steamed. 

These ceramic teapots are used to serve Matsutake Dobin Mushi, a favorite seasonal dish in Japan that relies on thinly sliced matsutake mushrooms to flavor a subtle broth as they steam in the pot. Other ingredients such as small pieces of chicken, fish, or shrimp along with a few thin slices of mild greens (e.g., yu choy, baby bok choy, or spinach) are also added. The teapot is served with a small upside-down cup fitted to the lid, with half a yuzu on top. The steaming broth is then poured into the cup with a squeeze of the citrus and sipped like tea, while the ingredients in the teapot are eaten with chopsticks. It's a ritualistic meal that evokes memories of brisk walks in the autumn woods as the leaves turn colors and fall to the ground.

You may see sources online suggesting the substitution of matsutake with shiitake, oyster, or cremini mushrooms. Certainly you can do that—but you won't be experiencing the ethereal and aromatic treat that only matsutke can provide and which the Japanese call "autumn aroma." As for the broth, think umami. I asked Taichi for some tips. He makes a kombu dashi and adds manila clams and black cod bones. Shrimp shells work, too. Avoid aromatics such as onion, carrot, and celery, he advised, because they will over-power the mushroom. Season the broth with sake, soy sauce, and sea salt. Lastly, it's important to allow the matsutake slices to steep in the broth and impart their hints of cinnamon, spice, and fungus. Taichi recommends gently warming the teapots with all their ingredients in a bamboo steamer rather than cooking directly over flame.

Matsutake mushrooms are pungent, with meaty texture—a little goes a long way. If you're buying matsutake in the market you'll be spending a frightening amount per pound (they were $70/lb at my local Japanese grocer the other day), but luckily you don't need a lot, so just get a small button to serve two. And if you can forage them yourself in the forest, all the better. Mine came from a patch not far from Seattle, where I found several pounds of prime buttons pushing up through the moss beneath a Douglas fir. At the time I was hunting chanterelles, but I'll remember this surprise of a spot and return to it next year.

Matsutake Dobin Mushi

Serves 2

2 cups kombu dashi (see below) 20 grams kombu 4 manila clams 4 shrimp, peeled (reserve shells) 1 tbsp sake 1/2 tsp soy 1/4 tsp salt 1 small to medium matsutake button, thinly sliced 6 bite-sized, thin-sliced pieces chicken breast (or white fish fillet such as cod, rockfish, halibut) 2 baby bok choy (or other mild green), halved 1 yuzu, halved (or 2 lime wedges) 1. Make kombu dashi ahead. Soak 20 grams of kombu (dried kelp) in a pot with 4 1/2 cups cold water for several hours or overnight. Bring nearly to boil before removing kombu with tongs. Boiling will turn the dashi bitter. Refrigerate dashi or continue to next step. 2. Heat 2 cups of kombu dashi in a pot with clams and shrimp shells. When the clams have opened, remove all shells. Season broth with sake, soy sauce, and sea salt. Simmer until alcohol has cooked off. 3. Divide equal portions of sliced matsutake, greens, shrimp, and chicken into dobin mushi pots, then add hot broth. Replace lids and heat teapots in a bamboo steamer over a kettle of boiling water for several minutes. (You can also steam in a wok with a rack and lid.) This gentle steaming allows the matsutake to fully infuse the broth while the shrimp, chicken, and greens poach. 4. Serve Dobin Mushi with a half of yuzu or lime wedge placed on top of each inverted cup. After removing the teapot lid, inhale the autumn aroma. Winter is on its way.


Wednesday, October 10, 2018

Honey Mushrooms

It's time to tackle the honey mushroom. I haven't written about it before because it's not among my favorites in the Kingdom of Fungi, at least from an edibility standpoint, but in a season such as this, when the mushroom gods are being parsimonious with their gifts, the time is right to make use of this abundant species.

The parasitic honey fungus is famous for being the largest organism on the planet. In the Blue Mountains of Oregon, a single individual has been estimated at covering more than three square miles of Malheur National Forest and is killing the fir trees there.

Science once recognized the honey mushroom as Armillaria mellea. We now know it's a complex of similar looking species. This was another reason why I usually passed on the honey; it was rumored among mushroom hunters that not all species within the complex were choice for the table, and that some might not be edible at all. What has become clear in more recent years is that all honey mushrooms, no matter what species, should be fully cooked before serving and that some people, for reasons not entirely understood, will experience what is politely called gastric distress regardless of careful preparation.

Just the same, people all over the world eat and enjoy honey mushrooms, which are so named for their coloration, not their taste.

For more information about identification, check out this video, which contrasts the honey mushroom with a poisonous semi-lookalike, the deadly galerina. I usually find honeys in large clusters on dead or dying trees in the fall, from sea level to sub-alpine woods. They can vary significantly in appearance as they age, and will develop from small buttons into broad open caps. I look for young ones with veils covering the gills and I trim away the fibrous stems. Where I live, I don't have to go far for honeys. They grow in Seattle parks and along trails in the Cascade foothills just outside the city.

In my opinion, honey mushrooms are a lot like supermarket buttons in both taste and texture. They can be mucilaginous—another reason to cook them amply—though some recipes for soups and stews make use of this characteristic as a thickening agent.

I usually prepare them simply. The sautéed mushrooms pictured above were cooked in canola oil over medium heat for several minutes before I lowered the heat and added butter and garlic. After a few more minutes on low, I stirred in some chopped parsley and served. Kinda like garlic bread for the carb-free set.

There are plenty other ways to prepare honey mushrooms. Remember to try just a small portion the first time you eat them, in case you're one of those who can't tolerate this mushroom.

Friday, March 23, 2018

Beef Pho with Licorice Fern

Everyone at the Mekong Market on Rainier Avenue knew what I was up to. The proprietor, a small gentleman always on the move, paused long enough to grin at the two packages of beef bones in my basket and give me the thumbs up. They were a dollar a pound.

Then he frowned when he saw the big bag of dried noodles—and quickly guided me by the elbow to a refrigerated aisle, where he pointed at the fresh rice stick noodles.

At the checkout, as I unloaded a bunch of basil, bean sprouts, a box of yellow rock sugar, and those fresh noodles, the Vietnamese lady in front of me said, "So you're making pho?"

I explained that I had a sick kid at home and this was his request. It was my first attempt. Did she approve of the beef bones?

Indeed. "But make sure to boil out the impurities," she added. This is a common refrain. All my online sources recommend a brief (three to five minutes) initial boil to exorcize from the beef bones what some call impurities and other call, simply, the scum.

I'm all for getting rid of the scum.

Here in Seattle there is likely more pho noodle soup for sale than any other dish. It's our favorite fast food. My kids have grown up with it and have some opinions. I wanted to do it right.

Besides making comfort food for my ailing boy, I also wanted to test an idea that had been percolating in my head for a couple years. There are two ingredients in a typical pho meant to impart a hint of licorice-like flavor, specifically star anise and fennel seeds. Star anise is native to southeast Asia. I wondered if I might use our native licorice fern instead of a spice from halfway around the world. (Read more about licorice fern here.)

I split my batch of pho and designed a simple A-B test: one pot spiced with star anise and the other with licorice fern.

The short answer is that both phos were smashing. The licorice fern, however, won't end up as a local substitute for star anise in my future attempts. Instead, it proved to be yet another possible variation in an eminently malleable dish that's always been a cultural mashup from its earliest beginnings in French-colonial Vietnam.

After testing the two batches, I recombined them. The fern root can't take the place of star anise, but like a stick of black licorice candy, it adds a back-of-the-palate sensation of spicy coolness—a palpable sensation similar to the way Sichuan peppercorn numbs and tingles the lips.

There are plenty of very similar recipes online for pho. Most of them recommend using cut up beef bones (knuckles, shins, etc.) and doing an initial boil to cook out the foam and impurities. This results in a broth that isn't murky. Charring the onions and ginger in the broiler before adding to the broth is another crucial step. I adapted my recipe from this video.

5 - 6 lbs beef bones
6 quarts cold water
2 medium onions, quartered
4-inch piece of ginger, halved lengthwise
1/4 cup fish sauce
1 1/2 tbsp salt
1-inch piece yellow rock sugar
2 cinnamon sticks
1 tbsp coriander seeds
1 tbsp fennel seeds
6 star anise
6 cloves
2 pencil-sized licorice fern roots, peeled and cut into 1/4-inch pieces
thin-sliced beef such as rib-eye, skirt, ti-tip, sirloin, etc.
1 package thin bánh phở rice stick noodles
sprigs of basil, mint, cilantro
bean sprouts
lime
thin-sliced red pepper
sriracha and hoisin sauce

1. In a large stock pot, cover beef bones with cold water and heat over high flame.

2. Meanwhile, heat oven on broil and place onions and ginger in a roasting pan just beneath heat. Roast 15 - 20 minutes, turning occasionally with tongs, until charred on all sides.

3. Toast spices (cinnamon sticks, coriander seeds, fennel seeds, star anise, and cloves) in a dry pan over low heat for 5 minutes, careful not to burn.

4. When stock pot comes to boil, cook 3 minutes so that scum rises to the surface. Drain in sink and rinse bones and pot with warm water. Return bones to pot and cover with 6 quarts of cold water. Bring to boil once again, then reduce heat to simmer.

5. Once broth is simmering, add roasted onions and ginger, fish sauce, salt, yellow rock sugar, toasted spices, and licorice fern. Simmer, uncovered, at least 3 hours. Skim off any scum that rises to surface.

6. Remove bones with tongs, then strain broth through a fine mesh strainer to remove remaining solids. Refrigerate broth overnight to easily separate remaining layer of fat, if desired.

7. To assemble finished dish, add rice noodles and thin-sliced beef to bowl. Cover with hot broth and serve with bean spouts, lime wedges, hot pepper slices, and sprigs of basil, cilantro, and mint, along with condiments such as sriracha and hoisin.


Thursday, January 11, 2018

Matsutake Sukiyaki Hotpot

I GOT A CALL from Doug (of The Mushroom Hunters) the other day. He's bivouacked somewhere down in Humboldt or Mendocino County picking blacks and hogs. Meanwhile, Norcal friends of mine have been heckling me with texts and photos of their matsutake hauls of late.

Matsutake was still on sale (for outrageous prices) at Uwajimaya in Seattle last time I looked, so if you don't live in California you might be able to make this dish with fresh store-bought mushrooms. Me, I had some just before the holiday season, which occasions this post, and probably won't enjoy it again until next fall.

***

AS A CHILD of the seventies, I'm well acquainted with regrettable fads, from pet rocks to Farrah Fawcett haircuts.

Fondu is not among them.

Our family loved fondu, one of many food crazes during that unfairly maligned decade, and we went through a few different fondu cooking sets just as Star Wars was beginning its long run. Invariably the slender forks got lost or broken, and anything made of wood ended up scorched by the little Sterno tins. But under the Christmas tree each year there would be a fresh new set to put to work.

Forget the Euro-Swiss cheese thing. We all preferred meat fondu, cooked in a pot of boiling oil that could have easily sent one of us kids to the ER with a misplaced elbow, not that anyone worried about stuff like that back then. My dad would bring home good beef from the butcher, pre-cut into small cubes; Mom kept the cupboard stocked with the few sauces available at the time, most of them with a Kikkoman label.


I WAS REMINDED of these good times around the fondu pot after spending an evening with my friend Taichi Kitamura recently at his top-notch Japanese restaurant, Sushi Kappo Tamura, devouring Sukiyaki Hotpot.

It was the tail-end of matsutake mushroom season in the Pacific Northwest and Taichi invited me to partake in a traditional preparation. With a dozen of us at the table, he had three bubbling hotpots along with platters overflowing with matsutake mushrooms, thinly sliced rib-eye and short rib, Napa cabbage, tofu, and pre-cooked cellophane noodles.

Taichi doesn't use beef stock in his broth, or any stock for that matter, and I soon discovered that a simple mixture of water, sake, and soy sauce (sweetened with sugar) becomes increasingly profound as more ingredients, especially fresh slivers of matsutake buttons and premium cuts of beef, are cooked in it over the course of the evening.

The matsutake gives the broth its signature taste that is reminiscent of cinnamon and spice yet earthy and, for lack of a better word, fungaly. Autumn aroma is how the Japanese describe this tantalizing flavor. By the end, all the guests were clamoring for to-go containers so they could take home the rich dregs of this amazing broth mixed with a little rice.

Now I'm shopping for a fondu set—or maybe even a traditional Japanese or Korean hotpot. Regular readers will know that I've posted a Matsutake Sukiyaki recipe in the past, but Taichi has convinced me that it can be so much simpler and just as delicious. From now on I won't be sautéing any of the sukiyaki ingredients; it's just as tasty (even more so) to cook all the ingredients right in the pot, while sitting around the table with friends and family just like the old fondu days.

This same method is easily accomplished in the woods, by the way, after a long day of mushroom hunting, which puts it on an even higher level in my book.

3 cups water
1 cup soy sauce
1 cup sake
1/3 cup sugar (or more, to taste; Taichi will use as much as 3/4 cup)
3 - 4 (or more) matsutake buttons, thinly sliced
1 lb beef, thinly sliced (rib-eye, short rib, etc.)
1 lb cellophane noodles, pre-cooked
1/2 small Napa cabbage, sliced into wide ribbons
1 package tofu, cubed
1 small onion, sliced into half-moons (optional)
rice to accompany

1. Make rice and prepare raw hotpot ingredients: arrange beef on a platter, cube tofu, slice matsutake mushrooms and cabbage, and boil noodles until al dente before rinsing with cold tap water.

2. In a pot mix together water, sake, soy sauce, and sugar. Bring to a boil, then reduce heat slightly. Allow some of the sake alcohol to burn off before adding matsutake. Cook matsutake at a low boil or high simmer for a few minutes until its flavor has infused the broth, then begin adding raw ingredients in small portions. Add noodles last, just before ladling into bowls and serving with rice. Repeat. And repeat again.

Serves 4.


Saturday, April 29, 2017

Wild Ramp Aioli

Every year for Memorial Day weekend our family goes camping with several other families in a beautiful canyon in the rain shadow of the Cascades, where we have a decidedly better shot at some sun.

The food is always over the top. In past years we've barbecued a whole pig, grilled Copper River salmon over the fire, dug holes in the ground for Dutch ovens to make Chicken in the Dirt, and prepared all sorts of appetizers and dinners with our foraged morels and spring porcini.

But the dish that everyone seems to clamor for most is an elaborate concoction of smoked baby potatoes with black garlic vinaigrette and wild ramp aioli. (Ramps are a type of wild leek that grows east of the Rockies.) For years I thought my friend J had invented this carnival of flavors, but it turns out the Danish expat by way of San Francisco picked up the recipe during his Bay Area years, from a little joint you may have heard of called Bar Tartine.

I don't normally have the patience to put all those pieces together into a single dish. Instead I wait for its fireside appearance each spring, knowing J can't go without. The ramp aioli by itself, however, is right in my wheelhouse, so when I got a message from my mushroom hunting pal David saying that some fresh ramps were coming my way, compliments of his employer Earthy Delights, I knew just what to do.

This wasn't my first brush with ramps. I've seen plenty while picking morels back east. Ramps are beloved in the Appalachians, especially in West Virginia where nearly every little mountain town has a ramp festival, and in the northern woods of Michigan. On my last visit to the Upper Peninsula I picked ramps with friends from Marquette. But that was a while ago, and if there's one wild food I wished was native to the Pacific Northwest, the ramp would be near the top of the list.

To make this wild ramp aioli I used pickled ramps. The recipe is a conflation of Earthy Delight's version and Tartine's. You can use fresh ramps, too, and in a few weeks I plan to update this post after using ramps that are currently fermenting in my basement, which is the method that my friend J and Bar Tartine prefer.

3 pickled or fermented ramps*, with tops**
1/2 tsp dried mustard
1/2 tsp peppercorns
1/2 tsp apple cider vinegar
2 tsp lemon juice
1 egg yolk
1/3 cup grapeseed or canola oil
2 tbsp olive oil
salt to taste

1. Place food processor bowl and blade in freezer for 15 minutes if possible.

2. Chop ramps. (I used previously pickled ramp bulbs and fresh tops—see notes below.)

3. Add chopped ramps, dried mustard, peppercorns, cider vinegar, lemon juice, and egg yolk to food processor and process until well mixed together, about 30 seconds.

4. Combine oils and slowly add to processor. Ingredients should thicken to a mayo-like consistency. Continue to add oil. Add salt to taste and more lemon juice or vinegar if necessary.

5. Refrigerate in a tightly sealed container.

Makes enough to fill a 6-oz jelly jar.

The ramp aioli will have the rich flavor and creamy consistency of a typical aioli or mayonnaise, but with the added garlicky bite of wild ramps. Using just the yolk and not the egg white will give it more body. For a chunkier aioli with flecks of bright green ramp tops, don't over-process (unlike mine pictured above).

* Pickled Ramps recipe:

1lb ramps
1 cup white wine vinegar
1 cup water
1 cup sugar
1 tsp mustard seed
1 tsp coriander seed
1 tsp fennel seed
2 tsp mixed peppercorns
1 bay leaf
1 tbsp salt

1. Cut off root tips from ramps and trim leaves, leaving just a little green. Reserve tops for another use. Rinse ramps.

2. Blanche trimmed ramps in a pot of salted boiling water for 30 seconds. Remove and quickly shock under cold tap. Pat dry and place in a pint-sized canning jar.

3. Combine pickling ingredients in saucepan and bring to a boil. Pour over ramps and set aside to cool. Seal tightly and refrigerate up to two months.

** If using fresh ramps for the aioli, cut off the tops (the green leaves) and then blanche the tops in boiling water for 30 seconds, shock under cold tap, and squeeze out excess water before adding to food processor.

Tuesday, February 14, 2017

Candy Cap Custard

This winter, mushroom hunters in California are crying Hallelujah! Unless they happen to live below Oroville Dam...

The Golden State hasn't seen rain like this in several years, and the fungi have responded in kind. But with so many storms rolling in off the Pacific, the mushroom patches have also taken a beating, so timing is still everything.

I was able to thread the needle earlier this winter, sneaking into Santa Cruz for a week of sunshine right after a major pummeling that washed out roads near where I was staying in the hills. The weather turned again just as I was leaving.

My destination was the Santa Cruz Fungus Fair, one of the great myco events on the West Coast, but I also managed to get into nearby woods to pick a year-plus supply of candy caps.

I've written about candy caps before. It's a complex of species in the milk cap genus, Lactarius. Candy caps are noteworthy for smelling intensely of maple syrup once dried, effectively putting mushrooms on the dessert menu. The two species of candy cap I encountered on this trip were L. rubidus and L. rufulus. The latter grows with oaks and is quite mild, but the former—if dehydrated at a low temperature (I think we set our dryer to 95 degrees)—is wonderfully fragrant. We found hundreds of them growing among a stand of old Monterrey pines.

Though candy cap cookies are my usual go-to recipe, the first thing I made when I got home with my bounty was an egg custard, adapting a very simple recipe that I typically make with huckleberries. The candy caps gave this creamy and satisfying dessert a pungent aroma of maple syrup, which paired well with the huckleberries on top.

1 small handful dried candy caps
1 cup evaporated milk
1 cup water
4 egg yolks
1/3 cup sugar
1/4 tsp salt
1/2 tsp vanilla extract
1/2 cup huckleberries
fresh nutmeg or cinnamon, grated to taste

1. Pulverize dried candy caps to dust in a spice grinder or food processor. Pass through wire mesh sieve to remove any large pieces. Cover mushroom dust with 1 cup warm water and set aside for 20 minutes.

2. Pre-heat over to 325 degrees. Combine milk and mushroom water in a small saucepan and bring to boil. Remove from heat.

3. Mix egg yolks, sugar, salt, and vanilla together in a bowl.

4. Slowly whisk in hot milk-water mixture until frothy. Pour into 4 ramekins.

5. Place ramekins in an oven-proof dish or tray filled with warm water. Bake for 40 minutes. Carefully place a small handful of huckleberries atop each custard and bake another 10 minutes. Test one for doneness with a knife tip; if it comes away clean, the custard is done. Sprinkle with fresh nutmeg or cinnamon. Serve hot or cold.

Thursday, November 3, 2016

Wild Mushroom Bread Pudding

I've been cooped up this fall, finishing a new book. (More on that later.) Meanwhile I get the usual texts and emails from friends in the patch, scoring hauls of chanterelles and porcini, sparassis and matsi. So it was a relief to finally get out the other day.

Hopeful forecasts for a good ski season seem to have some merit. Above 1,500 feet the thermometer was in the low 30's, and above 4,000 feet there was a nice dusting of snow. I went up to some of my higher elevation patches anyway just for a look—and it didn't take long to see that many of the high country mushrooms are done for the year in the North Cascades, although matsutake continue to plug along. But down around 2,000 feet I found kings, hedgehogs, chanterelles, more matsi, and lots of gypsies. So I have not gone without my annual infusion of Matsutake Sukiyaki.

As for the others, I chopped them up for a bread pudding served with a roast chicken. Normally I make a typical stuffing for the bird, but this totally un-fussy bread pudding is now my go-to. It really shines with wild mushrooms.

4 - 6 cups stale country bread, cut into 1-inch cubes
4 tbsp butter, divided (plus more if needed)
2 medium yellow onions, chopped
1 lb wild mushrooms (e.g., chanterelles, porcini, hedgehogs, etc.), rough cut
3 large eggs
2 cups half and half
1 heaping cup grated Gruyère cheese
handful parsley, chopped
salt and pepper, to taste

1. In a large skillet, sauté onions in 2 tablespoons of butter over medium heat until caramelized. Add more butter if necessary and reduce heat so that onions are nicely browned and not burned. Remove from pan.

2. Pre-heat oven to 350 degrees.

3. In same pan, melt another 2 tablespoons of butter over medium heat and sauté mushrooms. Cook off any liquid released by mushrooms and season with salt and pepper. Remove from pan.

4. Beat eggs in a large bowl with half and half. Mix in grated cheese and parsley. Season with salt and pepper, to taste. Add bread, onions, mushrooms, and stir together.

5. Grease an 8-inch baking dish and dollop in bread pudding. Cover and bake for 20 minutes. Remove lid and bake another 20 minutes, until pudding begins to brown on top and is cooked through.

Tuesday, August 9, 2016

Chokecherry Jelly

Last week Martha and I spent a couple days mountain biking near Winthrop, Washington, not far from North Cascades National Park. On our way home we couldn't resist stopping off at a few roadside patches bursting with fruit. Elderberries were already ripening, and chokecherry trees hung heavy in the sun.

The chokecherry (Prunus virginiana) is a shrub or small tree native to much of North America, mostly above the Mason-Dixon line. Here in Washington State, as in much of the Western U.S., chokecherries prefer drier habitats (in our case, rain-shadow terrain east of the Cascade Crest), such as arid canyons, gullies, and scrubby benches above lakes or streams, where you'll sometimes find them clustered with elderberries and serviceberries. Named for their astringency, chokecherries get sweeter as they darken, but if you wait too long the birds and other critters will nab them first.

Martha and I grabbed plastic grocery bags repurposed just for such an occasion (I always keep a few handy in the car) and started pulling bunches of fruit from the trees as cedar waxwings and robins voiced their disapproval from above. Martha tasted one off the vine; her mouth went into an instant and involuntary pucker. Though it was a little early, we scouted for trees with the ripest fruit, knowing this harvest would need some sugar at home. It didn't take long to amass several pounds between the two of us.

Jelly is probably my favorite use for chokecherries. I've also had them in a chunkier form preserved in sweet syrup. This was on the Umatilla Indian Reservation during the First Foods ceremony last spring. Along with a variety of roots, huckleberries, venison, and, of course, salmon, the chokecherry is revered by the Umatilla as one of their original food staples, and no wonder. They grow in profusion throughout the drier parts of the Pacific Northwest, and with a little processing that involuntary pucker becomes a lip-smacking grin.

We washed and rinsed our chokecherries at home and then covered them with water in a kettle. The kitchen soon filled with a distinctive cherry aroma as they simmered on the stove. After processing the fruit we had two quarts of fuchsia-colored juice. One quart got put up for a future jelly-making session and the other went back into the pot. The resulting jelly is easily one of the most beautiful for its luminous color, right up there with Rosehip Jelly. It's pink and doesn't look like anything you'd expect to find in nature. Even with added pectin, the jelly is soft and smooth, barely holding together, which is just how we like it.

This recipe is for 4 cups of chokecherry juice. It's on the tart side. If you like your jelly sweeter, or you have less juice, adjust accordingly. You'll need to add a commercial pectin because chokecherries are low in natural pectin.

4 cups chokecherry juice
5 cups sugar
1 package (1.75 oz) dry pectin
1/2 cup lemon juice

1. Cover chokecherries with water in a non-reactive stock pot and bring to boil over high heat. Reduce heat and simmer 30 minutes, occasionally mashing softened chokecherries with a potato masher. Allow to cool, then strain juice through cheesecloth or jelly bag.

2. Return 4 cups chokecherry juice to pot along with pectin and lemon juice. Bring to boil and add sugar, stirring. After a minute of hard boiling (careful not to foam over), reduce heat and simmer for 5 minutes, stirring.

3. Remove from heat and skim foam. Ladle into sterilized canning jars, leaving 1/2 inch head room, and secure lids. Process jars in hot water bath for 10 minutes.

Thursday, April 21, 2016

Pasta with Oyster Mushrooms and Smoked Ham Hock

My usual oyster mushroom spots aren't producing so well this year. Maybe it's the combination of record winter rain followed by record spring heat. Who knows? Fungi are mysterious.

I've gotten used to kicking off the spring mushroom season with oysters before heading to the dry side of the mountains for morels and porcini. So I tried something new: cultivated oyster mushrooms.

While in Vancouver, BC, to give a talk at the local mycological society, one of the members, known as The Mushroom Man, hooked me up with an oyster log. In the past I've found my own wild oyster logs in the woods and fruited them at home, but this was my first attempt with a commercially inoculated log (basically a block of compressed sawdust that's been injected with oyster mushroom spores and incubated in a plastic bag that retains moisture and humidity). I followed the directions, gave the log a good soaking, made a few incisions in the plastic wrapping so it could breathe, put it in a cool corner of the basement—and promptly forgot about it.

A couple weeks later Martha told me I better go check on my log. Sure enough, the enormous caps of fresh oysters were sprouting from the top. I harvested this first flush and watered the log again. A second fruiting is just starting as I type this.

In the past I've made a lot of Asian-style dishes with oysters, like Bibimbap and Udon Soup. This time I put them to use in a classic Italian pasta where they went toe-to-toe with a smoked ham hock that had been braised in white wine, chicken stock, fennel, onion, and garlic. The resulting stock became the base of the sauce and was insanely savory, while the tender hock meat paired perfectly with the robust and chewy oyster mushrooms.

Growing oyster mushrooms at home is a fun science experiment, especially for kids, and at the end you get a delicious meal. Just make sure to check your log every day or you may miss the action.

Braised Ham Hock

1 ham hock
1 cup white wine
1 cup chicken stock
1/2 small fennel bulb, chopped
1/2 small onion, chopped
2 cloves garlic, pressed
1/2 tsp black peppercorns

Pasta Sauce

2 tbsp butter, divided, plus extra if necessary
1 large shallot, diced
1/2 pound oyster mushrooms, chopped
1/4 cup white wine
1/2 cup reserved braising stock
1/2 cup heavy cream (or milk or half and half), divided
1/2 cup reserved braised ham hock meat
1/4 cup frozen peas
1 - 2 oz goat cheese
1/4 cup parmesan cheese, grated
8 oz fresh pasta

1. Braise smoked ham hock. I had my butcher saw the hock in half, then I braised it in a small pot with white wine, chicken stock, fennel, onion, garlic, and peppercorns. The liquid should cover about two-thirds of the hock. Simmer, with lid on, for about two hours, checking occasionally to make sure there's enough liquid, until meat falls off the bone. Add more water, stock, or wine if necessary. When meat is tender, discard bone and fat, reserving braised ham. Strain stock and reserve. You should have plenty of meat and some stock left over for another use. Set aside enough meat and stock for pasta, about a half-cup of each.

2. Over medium heat sauté diced shallot in a tablespoon of butter. Add chopped oyster mushrooms and cook together several minutes. Add more butter if necessary. Deglaze with a splash of white wine. Add a ladle of reserved braising stock and a quarter cup (or more) of cream or milk and reduce over low heat.

3. Pre-heat oven to 350 degrees. Add 1 tbsp butter and quarter cup of cream or milk to large pasta bowl and warm in oven.

3. Cook and drain pasta according to directions. Meanwhile add frozen peas, braised ham, and goat cheese to sauce, stir lightly for a minute, and toss with pasta in warm bowl. Finish with grated parm.

Thursday, November 12, 2015

Saffron Milk Caps

The saffron milk cap is a wild mushroom that most pot hunters leave to the Russians. That's too bad because it's tasty and abundant.

Saffrons, or ryzhiki in Russia, are actually a complex of species in the Lactarius genus, and much DNA work needs to be done to separate the North American varieties. They're called milk caps for a latex they exude when cut. Some milk caps bleed white, some yellow, others red or orange.

Eastern Europeans have admired saffron milk caps for eons. I see Russians and Ukrainians in the woods outside Seattle carrying baskets overflowing with saffrons while their competition from other parts of the world is only too happy to leave the milk caps in the duff and fill their own buckets with matsutake or hedgehogs.

Saffrons bleed red or orange. The two most common saffrons for the table are Lactarius rubrilacteus and L. deliciosus (again, these taxonomic names are likely to change with future genetic testing). Both will bruise a greenish color (see photo above), which vanishes with cooking. I found the saffrons pictured here at about 4,000 feet in the North Cascades on the edge of an old-growth forest of mostly hemlock amidst a few patches of snow on the ground. They bled a reddish-orange color (see photo below right), though not profusely, and the green bruising was minimal. Saffrons generally have zonate caps (concentric bands in varying hues of orange, pink, red, or green) but these rings were very subtle in my specimens. As you can see, they also had hollow or partially hollow stems.

Perhaps one of the reasons many pot hunters don't eat saffrons is the difficulty of identifying to species. With most mushrooms that's a no-no—and I'm still not sure exactly what species the pictured saffrons are. Jeremy Faber of Foraged and Found Edibles confirmed that he sells this species as a saffron milk cap and that, if not L. rubrilacteus, it's a close relative. He also said that saffrons will bleed less during heavy rains.

Saffron milk caps are versatile in the kitchen. My pal Hank Shaw, in a nod to Eastern European foodways, preserves them in salt. Sautéed, saffrons keep their salmon color and firm, almost crunchy texture.  Some mycophagists have complained of graininess, but prolonged cooking eliminates this. The key to using saffrons is taking care of them in the field and then using quickly at home. These mature milk caps pictured, though completely bug-free, were more suitable for the pan than pickling due to their large size. The green bruising isn't appetizing, but as I said, it disappears with cooking.

Recently I came across a mushroom cookbook with some excellent non-cheffy recipes for the home cook, The Edible Mushroom Book. The recipe that follows is adapted from that with a few tweaks.

Pan-fried Chicken with Saffron Milk Cap Ragout

3 - 4 chicken thighs, skin on
1/2 lb saffron milk caps, cut up
2 shallots, diced
1 - 2 cloves garlic, crushed
2 tbsp vegetable oil
2 tbsp butter
1 cup white wine
1 cup chicken stock
1/2 cup heavy cream
2 - 3 fresh sprigs fresh thyme
salt and pepper

1. Pre-heat oven to 400 degrees. Pat dry chicken and season with salt and pepper. In a medium saucepan, heat oil over medium-high and pan-fry, skin side first, until golden, a few minutes on each side. Remove to an oven-proof dish and continue cooking in oven until juices run clear, about 20 minutes.

2. In same saucepan, melt butter and sauté diced shallots until soft and translucent. Add mushrooms, thyme, and crushed garlic and continue cooking together a few minutes. Season with salt and pepper.

3. Deglaze pan with white wine and reduce by half. Add stock and heavy cream and reduce until desired consistency. Spoon mushroom sauce on plates and then place chicken atop sauce.

Serves 2


Thursday, October 29, 2015

Wild Mushroom Strudel

A couple weekends ago, while attending the Sunshine Coast Mushroom Festival in British Columbia, I got a bite of a Wild Mushroom Strudel and immediately vowed to make it at home.

First, though, I had to find the mushrooms. So I visited a regular patch on my way to Yakima to speak to the Yakima Valley Mushroom Society. It's a patch frequented by Eastern Europeans, especially Ukrainians, who pick a variety of different Leccinums including what they call "redcaps" (possibly Leccinum aurantiecum, though we're likely to see taxonomic changes in North America with further DNA testing). They leave all the matsutake, which happily went into my bucket, along with several gypsy mushrooms and a fat porcino of more than a pound that remarkably perched in the duff unscathed. When I got home, the gypsies and king bolete went into the strudel.

I've never made a strudel before. For this reason I kept things simple and bought frozen puff pastry from the store. You're welcome to make your own. A couple notes: braiding the puff pastry makes for an attractive presentation and allows air to escape through the vents so that the strudel doesn't blow up into a monstrosity. Dried porcini, though not mandatory, gives the strudel a deep mushroomy flavor. You need less of the mushroom mixture than you think. My next strudel will have a bit less than the one pictured here.

3 cups diced wild mushrooms
1 oz dried porcini (optional)
1 large shallot, diced
2 tbsp butter
olive oil
2 - 3 springs fresh thyme, de-stemmed
1/4 cup white wine
1 handful parsley, chopped
salt and pepper
1 sheet puff pastry
1 egg, beaten

1. If using dried porcini, pulverize in a food processor and rehydrate with 1 cup warm water. Set aside for 20 minutes.

2. Saute diced shallot in butter over medium heat until soft. Add diced mushrooms. Cook mushrooms and shallot together for several minutes. The mushrooms will soak up all the butter; add olive oil if necessary. When mushrooms begin to brown, deglaze pan with a splash of wine. Add mushroom stock and reduce until the mixture is moist but not wet. Stir in thyme and parsley. Season with salt and pepper to taste. Remove from heat.

3. Pre-heat oven to 350 degrees. Roll out puff pastry into a rectangle about  12 inches by 8 inches. Place pastry on a piece of baking parchment atop a cookie sheet. With a knife, make diagonal cuts to the edges of the two long sides, so that the pastry can be folded up in a braided pattern. Spoon mushroom mixture down the middle. Fold up the strudel and pinch the ends. Brush with eggwash and place in oven. Bake until golden, about 30 minutes.


Friday, October 2, 2015

Halibut with Cauliflower Mushroom & Root Vegetables

It's another dry fall in the Cascades. The new normal. Even so, mushrooms are up if you know where to look. I visited one of my favorite mountain porcini spots the other day only to find a parched landscape with nary a cap or stem in sight. This is why a mushroom hunter needs a diversified portfolio of patches. The next spot, lower in elevation, with taller trees, a nearby watercourse, and more moisture, paid off. I also found a smallish cauliflower mushroom, the prize of the day.

The cauliflower mushroom, genus Sparasiss, is one of my favorites. It looks like something that should be growing on the sea floor, not in a forest, and it's one of the best tasting of all the wild fungi.  The mushroom grows from the duff at the base of trees, old-growth Douglas fir in particular where I live. When you find one, make sure to cut it off at the base with a knife. I try to leave some behind to finish sporulating.

If there's one drawback to Sparasiss, it's cleaning them. All those ruffles and folds collect dirt and pine needles as the mushroom emerges from the ground—forest litter that's difficult to remove. I run the mushroom under a strong tap and try to get as much off as possible, then slice into smaller pieces and wash those as well.

Cauliflower mushrooms are among the tastiest of our wild edible fungi, and in the kitchen they can be used in all sorts of ways. I braise, pickle, and sauté them. They're especially good in a mushroomy broth. You can cook them for hours, infusing your other ingredients with deep fungal flavor, yet they still retain their al dente texture.

This is the sort of dish that would have intimidated me when I first started cooking and now is second nature. The different elements are bound by an intensely flavored yet soupy sauce of butter, chicken stock, and mushroom.

2 portions halibut fillet
1/2 lb cauliflower mushroom, cut into pieces
4 tbsp butter, plus extra
1 shallot, diced
1/4 cup white wine
2 cups chicken stock
1/4 lemon
root vegetable medley, julienned
olive oil
salt and pepper
parsley garnish

1. Pre-heat oven to 375 degrees. Peel and cut root vegetables into equal shapes and sizes. Mine were twice the size of matchsticks, with a mix of celery root, purple yam, parsnip, and carrots, enough to cover a small roasting pan. Brush on olive oil and roast in oven, cooking for minimum 1/2 hour, tossing and seasoning with salt and pepper at least once.

2. While root vegetables are roasting, heat a large sauce pan on medium-high and melt 2 tablespoons butter. Sauté diced shallot for a minute or two and add mushrooms. They'll soak up the butter quickly, so be ready to add more butter or olive oil. Once the mushrooms have reduced in size and started to brown on the edges, add a splash of wine to de-glaze. Now add 1/2 cup chicken stock and cook that down, adding more stock as the broth reduces and starts to thicken, repeating until the broth is soupy and flavorful, 15 minutes or so. Squeeze in a quarter lemon. Before serving, stir in remaining 2 tablespoons butter.

3. When mushroom broth and root vegetables are nearly done, heat a non-stick pan on medium-high, grease with olive oil, and pan-fry halibut. Season with salt and pepper as you cook and add a little butter. Depending on thickness of fillets, cook each side for a few minutes until the fish is golden on the outside and opaque yet flaky tender inside. Spoon mushrooms and broth into bowls, cover with root vegetables, and top with fish. Sprinkle over a pinch of chopped parsley.

Serves 2


Monday, August 31, 2015

Ikura

With nearly 7 million pink salmon forecasted to return to Puget Sound rivers this year, just about everyone I know has been hitting the beaches with pink fever. Earlier in the month I spoke with David Hyde at KUOW about the many charms of pinkies, traditionally the least appreciated of our five Pacific salmon species. Since then I've nearly filled my catch card—and the freezer—with a year's supply of smoked salmon.

Today I searched this blog for a salmon caviar recipe and was surprised I'd never posted one. I've been curing salmon roe for years, ever since my pal Beedle (of Fat of the Land fame) showed me how more than a decade ago. Alas, it's been a year since my last caviar session and Beedle's notes have gone missing, so I took to the Web—and I'm glad I did.

I found this post by someone named Marc at No Recipes. To separate salmon eggs from their skeins, I've always used the warm water method. Though it works, it's messy and time-consuming, and the act of picking out all those nasty little bits of skein deserves to have its own ring in Hell. Instead I gave Marc's method a try...and I'm here to tell you it works. I found a wire cooling rack, the sort you might use for cookies hot out of the oven, and placed it over a large mixing bowl. Next I opened up the skeins and ran them back and forth over the rack. The eggs fell easily into the bowl. Besides doing the job quickly with minimal wastage, the process is an object lesson in the durability of salmon eggs. They're tough! Nature takes care of its own, if we let it.

After separating the eggs, I rinsed them in a wire mesh strainer with cold tap water and then adapted Marc's recommended ikura recipe rather than making my usual salt brine. Because I was using smaller pink salmon skeins, and because I didn't have any sake on hand, I halved his recipe and used aji-mirrin in place of sugar and sake.

3/4 cup dashi *
1 tbsp soy sauce
1 tbsp aji-mirrin
2 tsp kosher salt
2 small skeins salmon roe

* For making homemade dashi, see my post on Oyster Mushroom Udon.

1. Peel open egg skein with fingers. Separate salmon eggs from skeins by rubbing the open end of the skein across a wire cooling rack.

2. Mix curing ingredients together in a bowl and add the eggs. Refrigerate overnight, curing from 12 to 24 hours.

3. Drain. Ikura will keep in a refrigerated glass jar for several days.

I've eaten variations of salmon caviar and ikura made from every species of Pacific salmon. They're all good. Chum salmon eggs are especially beloved in Japan, but pinks have their own merits. The briny goodness of cured salmon eggs popping in your mouth is one of the great culinary delights—and a good reason to go catch a salmon.


Monday, July 6, 2015

Rock 'n' Roll

Seattle is bursting at the seams. Growing pains are being felt in all sorts of ways. Besides the traffic, an increase in fishing pressure is not just the stuff of grumbling old salts at the local. Take crabbing. According to the Washington Department of Fish and Wildlife's web site, "Catch estimates for Puget Sound as a whole show that recreational [crab] harvest more than doubled from 1996 to 2005." I can only imagine what the last ten years show.

The good news is that lots of people are getting outside and connecting with their natural heritage; the bad news is that this means shorter seasons, smaller bag limits, and increased competition. Fish and Wildlife manages the fishery carefully so that the tribes, commercials, and sports all get a piece of the action. In part, the agency depends on ever more accurate data to effectively balance the quotas, which is why crabbers now must purchase a crab endorsement (it cost me $8.75 the other day) in addition to a license and return a crab catch record card at the end of the season, just the way you would for salmon and steelhead. Then the number crunchers take over.

Summer crab season opened this past week for much of Puget Sound. I suppose I should feel lucky that I got a few. My usual spot was swarming with scuba divers. Every year their numbers increase. Out beyond the scuba crowd, a phalanx of small boats was busy dropping pots. On shore, guys were using spinning rods to cast miniature crab traps (the traps, about the size and shape of a suet bird feeder, are baited and rigged with loops of fishing line to snare the crabs). It was crabpalooza out there!

Meanwhile, a free diver such as myself just has to hope he can find some crabs in between the scuba crowd and the bank anglers.

It wasn't easy. I had to get resourceful. I only nabbed a single keeper Dungeness (a couple others were just shy of the 6 1/4-inch size limit and got tossed back). For the first time ever I decided to keep some good-sized rock crabs (pictured above and below). The size minimum is 5 inches across the carapace and these measured 6 inches, which is decent. Rock crabs have less meat than Dungeness, but they have large claws and their meat is sweet and delicious. And while rock crabs aren't as good as Dungies for a West Coast crab feed—their shells are thicker and require more effort to pick—they're still really tasty.


New England has the Lobster Roll. Out here on the Left Coast, we have the Dungie Roll—unless you want to take advantage of an underutilized seafood and treat yourself to a Rock 'n' Roll.

3 large rock crabs, shelled
4 soft French rolls or hot dog buns
1 cup shredded lettuce
1 thinly sliced tomato
1 dollop mayonnaise
1/4 cup diced celery tops (the leafy parts)
1 green onion, thinly sliced
1 heaping tbsp chopped parsley
squeeze of lemon
seasoning, i.e. paprika, white pepper, salt

Gently mix together the crab meat, mayonnaise, diced celery, green onion, parsley, lemon juice, and seasonings. Lightly toast French rolls or hot dog buns, slather with mayo, and assemble with shredded lettuce, sliced tomato, and dollops of the crab salad. I had to use hamburger buns from the Columbia City Bakery because they were sold out of hot dog buns and potato rolls—my bad for waiting until 4 p.m. on July Fourth to go bread shopping.